Simple Bathroom Remodel - Albuquerque, NM
Simple bathroom Remodel - Before
Simple bathroom Remodel - Before
Simple bathroom Remodel - Before

Being built in the mid-40s, this house's bathroom was in need of some much-deserved TLC. The bathroom was in need of the most work. I started with removing the old flooring and removing the old, and loose plaster from the bottoms of the walls.
Simple Bathroom Remodel -During
Simple bathroom Remodel - Before
Simple bathroom Remodel - Before
Once the old sub flooring was replaced with fresh plywood, I prepped the floor with concrete backer and a waterproof membrane. New paint on repaired walls will help the final piece of the bathroom come together. I also raised the level of the toilet flange to account for the backer board and the new tile flooring.
Simple Bathroom Remodel - After
Simple bathroom Remodel - Before
Simple Bathroom Remodel - After
The finished product turned out even better than the customer (and I) imagined. To keep the spirit of the era the house was built in, the customer opted for a floor that represented the Art Deco style, and the end result is stunning. In the end, we:
- demolished and removed the old sub flooring
- replaced the old sub flooring with new plywood
- repaired the walls
- applied waterproof membrane to the new backer board
- Installed flange extender to raise flange height
- Installed 1x1 tile to recreate Art Deco style
- Installed base boards to match the rounded walls of the existing house
In the end, both the customer and I are excited about how this project turned out.
Tuff Shed Buildout - Albuquerque, NM
Lower Tuff Shed Buildout - Before
Lower Tuff Shed Buildout - Before
Lower Tuff Shed Buildout - Before

The client had a Tuff Shed built on their property for the purposes of creating a comfortable hobby room they could use year-round. They had a very specific idea of what they wanted done to create the ultimate "Zen Zone".
Upper Tuff Shed Buildout - Before
Lower Tuff Shed Buildout - Before
Lower Tuff Shed Buildout - Before
The space was insulated with spray insulation, which works as a great form of insulation, but can be challenging to properly prepare all wall and ceiling surfaces for drywall. A substantial amount of time went into trimming, and removal of areas of insulation so flat planes could be realized.
Lower Tuff Shed Buildout - After

To complete the client's vision, we ultimately did the following to successfully transform the space:
- Installed drywall on all walls and ceilings
- Performed skip-trowel texture walls in lower area
- Finished and painted all walls and ceilings
- Installed click-lock flooring in the upper and lower floors
- Installed attic ladder for access to upper area
- Installed passive ventilation between lower and upper areas
- Installed customer-provided DIY mini-split system
- Installed trim around wall bases, attic access, and doorway
Upper Tuff Shed Buildout - After
The client is excited to have such a comfortable and new space to practice her hobbies, and having the upstairs area completed give options for more space to relax. We are thankful to have been part of such a cool and unique buildout.
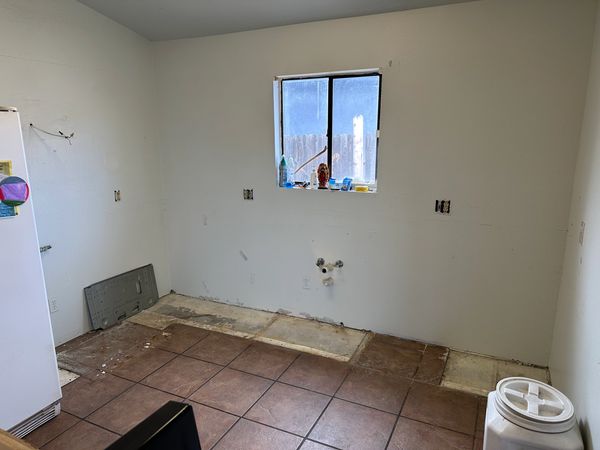
Residential Kitchen Remodel - Albuquerque, NM
Residential Kitchen Remodel - Before
Residential Kitchen Remodel - Before
Residential Kitchen Remodel - Before
The client needed their kitchen redone so they can put the house on the market without leaving the new owner without a proper kitchen. As you can see, it was in need of a lot of work to qualify as a functioning kitchen space.
Residential Kitchen Remodel -During
Residential Kitchen Remodel - Before
Residential Kitchen Remodel - Before
Once we pulled the existing fixtures out of the kitchen, we had to ensure that the new cabinets and bases lined up with the areas where the tile was cut to accommodate cabinets that were once there. The existing outlets, switches, and plumbing also needed attention.
Residential Kitchen Remodel - After
Once the kitchen was finished, the useable space was greatly improved.
In the process of the remodel, we:
- Installed new wall cabinets, and base cabinets
- Installed new countertops
- Installed a new sink faucet
- Installed new in-sink garbage disposal
- Replaced all outlets and switches
- Installed all new under-sink plumbing
- Skimmed the wall and prepped for paint
- Replaced old light fixtures (not shown)
Residential Kitchen Remodel - After

The clients loved the new, updated kitchen space, and although they will only be able to use it for a short time longer before the house sells, I am certain the new owners will be thankful for the major update.
Simple Bathroom Remodel - Albuquerque, NM
Simple bathroom Remodel - Before
Simple bathroom Remodel - Before
Simple bathroom Remodel - Before
After this customer's roof leaked, causing a large portion of the ceiling to collapse, it was time for a full bathroom remodel. Since this home was built in the late 40's there were lots of planned upgrades for both comfort and safety.
Simple Bathroom Remodel -During
Simple bathroom Remodel - Before
Simple bathroom Remodel - Before
Since the client and their family still needed to use the bathroom, it was important that we cleaned the job site daily, making sure that the bathroom was clean and safe to use. Our commitment to our clients' comfort is a priority.
Simple Bathroom Remodel - After
Simple bathroom Remodel - Before
Simple Bathroom Remodel - After
Once the bathroom was finished, the change was remarkable.
In the process of the remodel, we:
- Installed tile to ceiling height
-Installed insulation in the ceiling
- Installed dimable LED lighting
- Installed an exhaust fan
- Smoothed textured walls and painted
- Removed the built-in medicine cabinet
-Installed new lighting fixture over mirror
- Installed shelving
- Replaced old, worn out cloth wiring